I went in to smooth out some wrinkles. I walked out with something I hadn’t even thought to ask for — relief from the dry eyes that have been quietly ruining my eye makeup for years.
That’s the thing about doing your research. Sometimes the side benefit turns out to be the main event.
Today I’m giving you my full, honest review of Tixel — what it is, what it actually feels like, the recovery nobody tells you about, and whether I think it’s worth the investment for women like us.
This post contains affiliate links. See below for full disclosure.
First, Let Me Tell You Why I Was Even Looking at This
If you’ve followed me for a while, you know I approach beauty products and beauty tech the way I approach technology implementations at work: what’s the mechanism, what’s the evidence, and is it actually going to deliver? I have zero patience for things that sound impressive but don’t actually perform.
I’d been dealing with dry eye for a few years now, a lovely parting gift from a combination of thyroid issues and lens replacement surgery. And here’s the thing about dry eye that makes it a particular nightmare for anyone who wears eye makeup: your eyes don’t just feel dry and gritty. They overcompensate. So they water. Constantly. Tears running down your face for no reason, taking your carefully applied eyeshadow right along with them.
I cannot count the number of times I’ve arrived at the office and caught my reflection and thought, well, that’s gone. Usually my left eye, which is significantly worse than my right. It’s one of those things that sounds minor until it’s happened to you three times in a week and you’ve stopped bothering with liner.
So when I started hearing about Tixel and learned it had FDA clearance specifically for dry eye treatment, in addition to skin resurfacing, I paid attention.
So What Actually Is Tixel?
Let’s clear up the most common misconception right away: Tixel is not a laser.
Lasers use light. Tixel uses heat. Specifically, it uses a technology called thermomechanical ablation, which works by applying precise heat and pressure to the skin to stimulate collagen production. That collagen is what helps plump fine lines, improve texture, and tighten skin that’s starting to lose its elasticity.
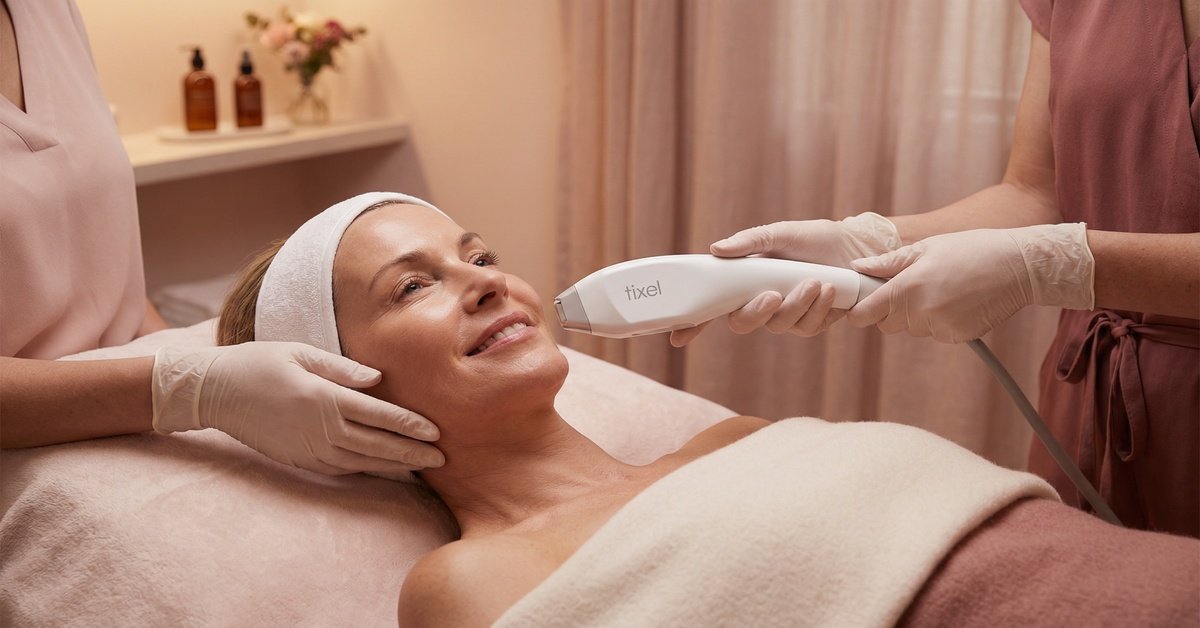
The device tip is made of titanium, and I described it in my video as a tiny medical-grade waffle iron, which is honestly the most accurate description I could come up with. It heats to around 400°C, which sounds alarming, but the contact with your skin is a fraction of a second. The heat transfers into the deeper layers of your skin without burning the surface. And because there’s no light or radiation involved, it’s generally safe for all skin tones.
Here’s the part that specifically caught my attention: it’s safe to use directly on the eyelids. That’s not something most resurfacing treatments can say. For those of us dealing with loose skin around the eyes, the kind that makes eyeshadow a daily exercise in patience, that’s significant.
How It Addresses Dry Eye
The mechanism here is actually pretty elegant. The meibomian glands in your eyelids produce oils that coat and protect your eyes. Over time, those oils can harden and clog the glands and hormonal changes accelerate this, . When the glands aren’t functioning properly, your eyes don’t get that protective coating, so they panic-produce watery tears instead.
The heat from the Tixel treatment melts those hardened oils and clears the glands. Once they’re working properly again, the overproduction of watery tears calms down.
For someone whose eye makeup has been disappearing before 10 a.m. for years, that’s not a small thing.
One important note: if you have melasma, please consult your dermatologist before pursuing this treatment. That’s not a disclaimer I’m throwing in to cover myself. It’s genuinely important information.
What Does It Actually Feel Like?
I’m going to be straight with you here, because I find the sanitized version of these procedures mildly insulting to our intelligence.
Do not skip the numbing cream. They let it sit for about 45 minutes before the treatment, and you need every one of those minutes. Don’t try to be stoic about it.
With the numbing, the sensation isn’t exactly painful. Intense is the more accurate word. It doesn’t feel like a laser snap. The closest description I can give you is a very quick hot stamp. Most of the face was genuinely tolerable.
The eyelids and the area around the mouth? Those were what I called “spicy” in my video. I’m standing by that word.
The strangest part isn’t even the heat. It’s the sound. Every time that titanium tip makes contact, you hear a small clicking noise. It’s a little startling at first, especially around the eyes, but because each contact is so brief, the heat doesn’t linger. You hear the click, you feel the heat, and it’s already moving on.
Immediately After
When I walked out, my face felt like a severe sunburn. She told me that would calm down in an hour or so. It actually took closer to two hours, but it did subside. However, after session 2 I got smart and took 2 Advil Dual Action as soon as I got home and the sunburn feeling disappeared in about 10 minutes.
One thing I wasn’t prepared for, and I was glad I had it in my stash, was a chilled exosome sheet mask. I applied it within two hours of getting home. Absolute relief. Cold, soothing, calming. If your provider offers you a refrigerated mask to take home, use it. That’s not an upsell. That’s practical aftercare.
The Recovery: What You Need to Know Before You Book
This is the part I want you to pay close attention to, because the marketing materials tend to gloss over some of it in a way that doesn’t serve you.
The First 48 Hours
No washing your face. I know. It’s deeply uncomfortable, especially around hour 36 when your skin starts feeling like 80-grit sandpaper. That texture is a good sign. It means the new skin underneath is doing its thing. But you will want to wash your face, and you will have to resist.
Use only the serums and products your provider sends you home with. This is not the time to experiment with anything from your current skincare shelf. Not even your vitamin C serum. Not even that new product you’ve been wanting to try. You just made hundreds of tiny channels in your skin. Respect the process.
After about 48 hours, you’ll start to see a fine grid pattern on your skin. Remember the waffle iron? That’s the proof. Tiny microscopic scabs forming in that grid pattern. It looks a little alarming up close. It’s actually exactly what’s supposed to happen.
Makeup Timing (Be Realistic With Yourself)
The brochures might suggest you can wear makeup within 24 hours. I’d encourage you to ignore that.
I had my treatment on a Friday. I wore makeup to work on Monday. Do I think that was ideal in hindsight? Not entirely, especially for the eye area. When I went back for my second treatment, I’m gave myself five to six days before I put anything on my eyes, although my eyelids didn’t scab as significantly the 2nd time. My colleagues will simply have to adjust to seeing me without eye makeup for a week. They’ll be fine.
Plan your video calls accordingly. Keep the camera off if you need to. This is not the week to have a big presentation on Zoom.
No Actives for Seven Days
Put the retinol down. No acids, no exfoliants, no vitamin C, no active ingredients of any kind for at least a week. Gentle cleanser, heavy moisturizer, sunscreen. That’s your entire routine. Treat your skin the way you’d treat someone who just had a procedure. Because it did.
The Products That Actually Helped Me Heal
Once I got through the first 48 hours and was working through the rest of that first week, a few products made a real difference:
- Calendula balm on the eyelid area at night, especially my left eye, which got pretty gross with scabbing. Calendula has genuine healing properties, and it gave that area some relief and supported faster healing.
- Rosehip oil as a base layer before anything else. The fatty acids in it create a foundation that helps everything else absorb better and feels genuinely restorative on compromised skin.
- An omega-rich eye cream applied around the orbital bone, not on the lid itself but along the bone, for the same reason. Fatty acids support healing.
- Sweet Chemistry Barrier Repairing Oil Serum. I’ll be honest, I went deep on the ingredient list on this one because that’s just how I’m wired, and it held up. One pump at night. The skin does most of its repair work while you sleep, so that’s when I use it.
- A lightweight daytime cream to layer with with oil serum to seal everything in.
- A heavier cream at night. I used the RMS Beauty Kakadu Luxe Cream, and if you want to feel like your skin is being genuinely cared for, this is the one.
With that layering approach, my skin healed quickly. The one spot I kept forgetting? Behind my ears. She treated all the way through the jawline, and that area tends to get neglected when you’re applying your serums. Don’t make my mistake.
The Investment Question
I’m going to be straightforward: Tixel is not inexpensive. Pricing varies depending on where you live, your provider, and which areas you’re treating. It’s an investment, and you should go into it knowing that.
A few things worth knowing:
- You don’t have to do a full face treatment. You can spot-treat: just the eyes, just the jawline and neck, just around the mouth. That flexibility makes it more accessible and more customizable.
- Most providers recommend three to five sessions, spaced four to six weeks apart. I opted for six weeks between my first and second.
- Some providers accept HSA funds. CareCredit with 0% interest is worth asking about too.
The way my provider framed the value made sense to me: you’re potentially addressing hyperpigmentation, texture, tone, and skin laxity in a single treatment series. For those of us managing multiple concerns, and honestly, who over 50 isn’t, that consolidation has real value.
My Bottom Line After Two Sessions
Was it spicy in places? Yes. I won’t pretend otherwise.
Was it worth it? For the dry eye improvement alone, yes. The texture changes are still developing, that’s how collagen remodeling works, it takes time, but after two sessions I’m already encouraged by what I’m seeing.
I feel comfortable with the safety profile. FDA cleared, no laser, no radiation, performed by a trained provider with a specific aftercare protocol. That’s controlled and predictable, which is what I want when I’m putting something on my face.
I have my third session coming up at the end of May and I’ll check in with you again after that.
If you want to see the full treatment and recovery in real time, I’ve linked my video below.
This post contains affiliate links. If you purchase a product through one of my links, I may earn a small commission at no additional cost to you. I am a participant in the Amazon Services LLC Associates Program, an affiliate advertising program designed to provide a means for sites to earn advertising fees by advertising and linking to Amazon.com. I only recommend products I have personally used and genuinely stand behind.